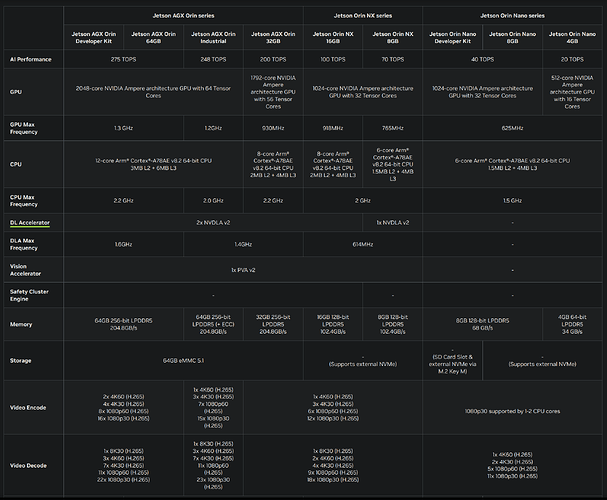
Nvidia Jetson Orin is the latest and greatest embedded platform from Nvidia, which comes in many different variations, depending on performance needed.
This wiki will be focused on:
- Nvidia Jetson Orin 8GB SOM
- Nvidia Jetson Orin Nano Developer Kit
- Booting Yoe on the dev kit
Nvidia Jetson Orin Nano Developer Kit Getting Started Guide
Nvidia Jetson Orin Nano Developer Kit Carrier Board Specification
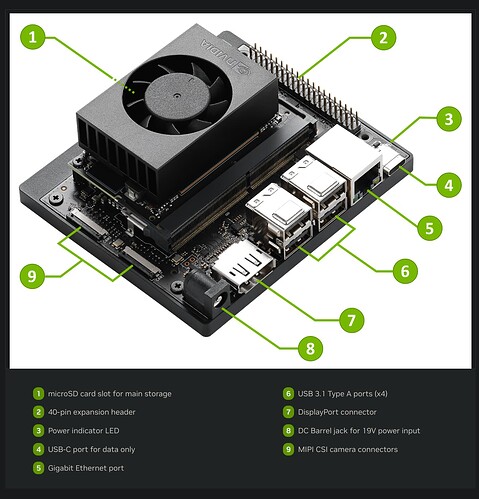
Dev Kit and Interface Layout:
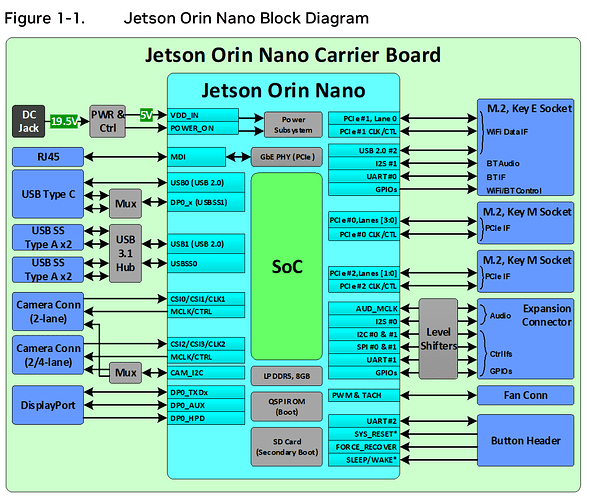
Nvidia Jetson Orin Nano Block Diagram
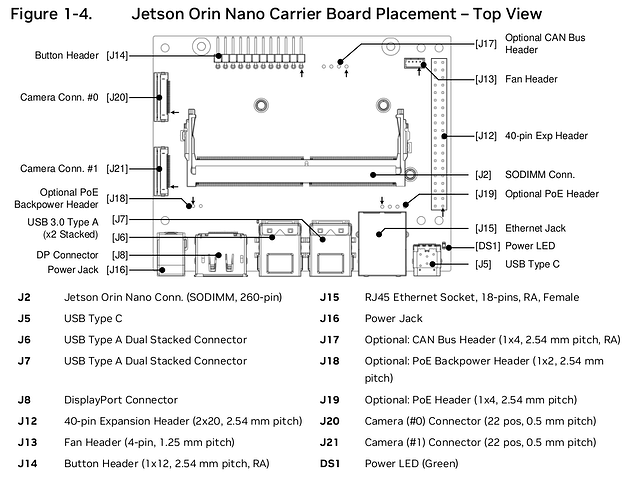
Nvidia Jetson Orin Nano Carrier Board Placement - Top View
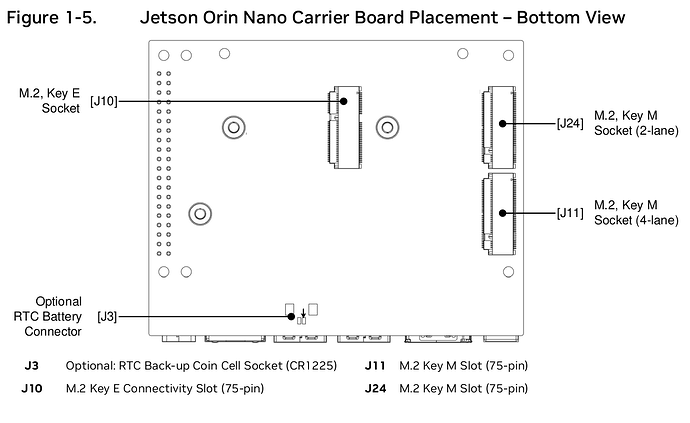
Nvidia Jetson Orin Nano Carrier Board Placement - Bottom View
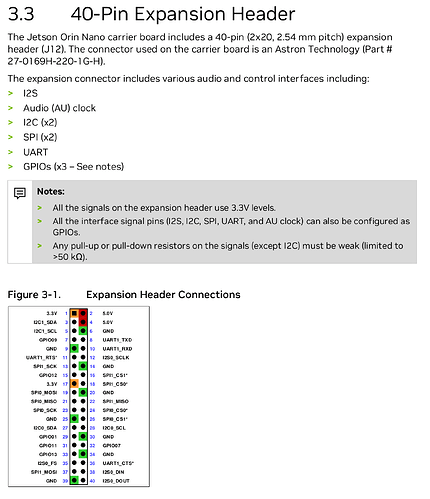
40-Pin Exapansion Header
USB Console Access:
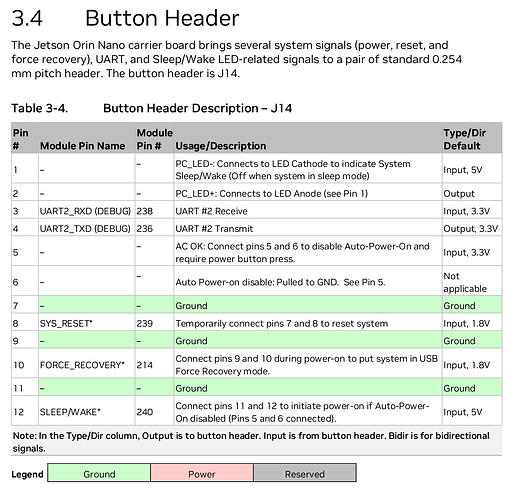
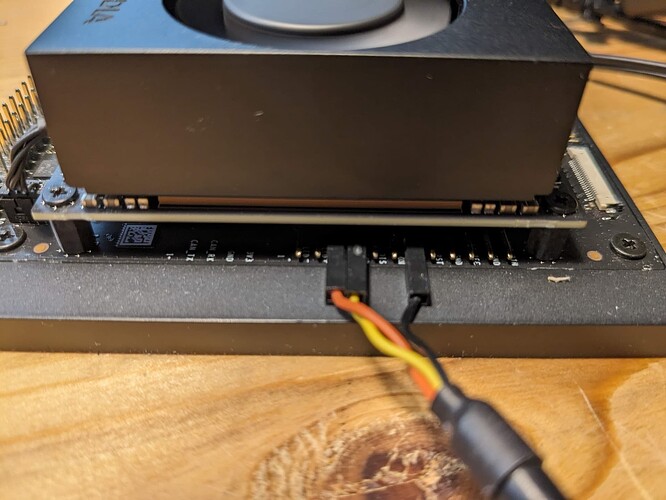
The dev kit doesn’t provide a USB console on the board for direct connection like most dev kits do. It instead brings out pins on the Button Header ( J14 ). You will need a USB to TTL cable to access the USB console port. I’ve been using this cable made by Adafruit from Amazon:
ADAFRUIT Industries 954 USB-to-TTL Serial Cable
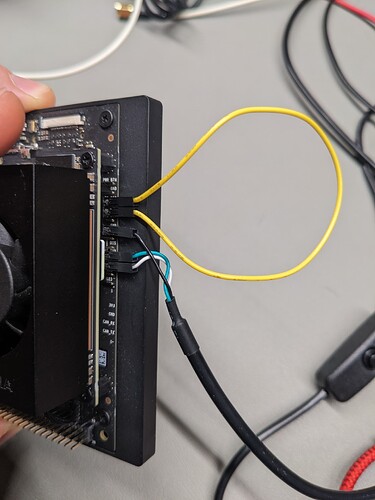
NOTE: You will need a jumper cable to be able to connect pins 9 and 10 to force the system into USB recovery mode to flash the device bootloaders for booting a Yoe image
Yoe - Building yoe-simple-image to run on the dev kit
(See updated posts below.)
Many thanks to the folks at RidgeRun Embedded Linux Developer Connection. Found several of their wiki pages very helpful:
Setting up Yocto
Flashing the Jetson Platform
Yocto BSP layer for Nvidia Jetson Modules: meta-tegra
All MACHINE configurations and associated MACHINE level components are included in this layer so it was added as another source layer
Yoe Project Configuration:
One of the most important settings to getting to a bootable image was adding the tegra image types to the IMAGE_CLASS variable. This adds the tegraflash tarball that is used for both the initial flash of the SOM, as well as creating a bootable uSD card.
IMAGE_CLASSES:append = " image_types_tegra"
Create yoe-simple-image from bmoyers/jetson branch:
Source jetson devkit project: . envsetup.sh jetson-orin-nano-devkit
Build the image: bitbake yoe-simple-image
Unpacking the tegraflash
- Create a temporary directory somewhere and cd into it
- Copy
yoe-simple-image-jetson-orin-nano-devkit.tegraflash.tar.gzto the tmp directory - Untar the archive:
tar -xzvf yoe-simple-image-jetson-orin-nano-devkit.tegraflash.tar.gz
Flashing the uSD card to boot Yoe Linux
- Insert a 32GB uSD card into the slot on the SOM (I have seen errors with bigger cards)
- Connect USB console cable described above to connect to J14 the button header (Note this is a crossover cable so connect the TX to the dev kit RX, and the RX to the dev kit TX)
- Use the jumper described above to connect pins 9 and 10 on J14 to put the device in FORCE_RECOVERY mode
- Connect the power supply to the dev kit
- Connect a USB C cable from the USB C connector on the dev kit to USB C port on computer. You should see something similar to this in dmesg:
[28355.858179] usb 7-2: new high-speed USB device number 5 using xhci_hcd
[28356.075177] usb 7-2: New USB device found, idVendor=0955, idProduct=7523, bcdDevice= 4.01
[28356.075179] usb 7-2: New USB device strings: Mfr=1, Product=2, SerialNumber=0
[28356.075180] usb 7-2: Product: APX
[28356.075181] usb 7-2: Manufacturer: NVIDIA Corp.
- In the tmp directory with the tegra flash components, run:
sudo ./doflash.sh
If all goes well with the flash, your uSD will be updated, and you should see Yoe boot up in your USB console:
Yoe Linux 2023.06 jetson-orin-nano-devkit ttyTCU0

jetson-orin-nano-devkit login: root
root@jetson-orin-nano-devkit:~#
ITEMS REMAINING TO BE DONE:
- How to flash NVMe drive and boot from it (Jetson does not have eMMC)
- Create initramfs-image to match the rest of the yoe projects
- Add Yoe updater support for rootfs provisioning, overlayfs, and firmware updates
